

In previous blogs, we have seen the installation of Ruby on Rails with Sqlite3. In this blog, we are going to cover following topics:
- Installation of Postgresql with Rails database set up
- Rails app for Post and Comments CRUD operations.
Step 1 – Setup PostgreSQL Database for Rails Development
By default, Ruby on Rails is using the SQLite database. It supports many databases system, including MySQL, SQLite, and PostgreSQL. And for this guide, we will be using PostgreSQL.
Install the PostgreSQL database using the apt command below.
sudo apt install postgresql postgresql-contrib libpq-dev -y
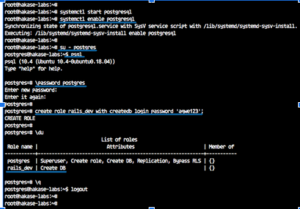
After all installation is complete, start the Postgres service and enable it to launch everytime at system boot.
systemctl start postgresql
systemctl enable postgresql
Next, we will configure a password for the Postgres user, and create a new user for the Rails installation.
Login to the ‘postgres’ user and run the Postgres shell.
su – postgres
psql
Change the Postgres password using the query below.
\password postgres
Type your password and the password for postgres user has been added.
Now we will create a new role for our rails installation. We will create a new role named ‘rails_dev’ with the privilege of creating the database and with the password ‘aqwe123’.
Run the Postgres query below.
create role rails_dev with createdb login password ‘aqwe123’;
Now check all available roles on the system.
\du
And you will get the ‘rails_dev’ role on the list.
PostgreSQL installation and configuration for Rails Development has been completed.
Step 2 – Create Your First App with Rails and PostgreSQL
Ruby on Rails provides a command-line ‘rails’ for bootstrapping our first rails application.
Create a new project ‘myapp’ with default database ‘PostgreSQL’ by running rails command below.
rails new myapp -d postgresql
Now you will see the ‘myapp’ directory, go to that directory and edit the database configuration file ‘database.yml’ using vim editor.
cd myapp/
vim config/database.yml
There are different configuration sections for each setup – Development, Testing, and Production.
In the development section, uncomment those line and change the value as below.
username: rails_dev
password: aqwe123
host: localhost
port 5423
For the testing section, paste those configurations under the testing section.
host: localhost
port: 5432
username: rails_dev
password: aqwe123
Save and exit.
Now generate the database and make sure there is no error.
rails db:setup
rails db:migrate
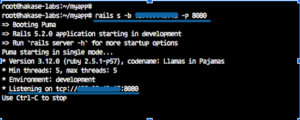
When all setup is complete, start the default puma rails web server using the command below.
rails s -b 192.168.1.10 -p 8080
The first rails project will be running on the IP address ‘192.168.1.10’ with port 8080.
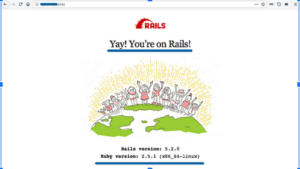
Open your web browser and type the server IP address on the address bar.
You will get the default rails project homepage as below.
Next, we will test to create simple CRUD with PostgreSQL database on rails.
Run the rails command below.
rails g scaffold Post title:string body:text
rake db:migrate
Run the puma web server again.
rails s -b 192.168.1.10 -p 8080
And open the web browser with the URL below.
http://192.168.1.10:8080/posts/
Now you will get the simple CRUD form.
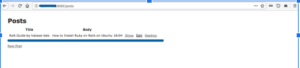
And following is my result after creating a simple post.
Ruby on Rails installation with PostgreSQL database on Ubuntu 18.04 LTS has been completed successfully.
I like it when people get together and share ideas. Great website, stick with it! Damara Corney Pich
Absolutely composed content, Really enjoyed examining. Marjie Valentin Biondo
For a much better expertise, please enable JavaScript in your browser just before proceeding. Walliw Derward Sephira
After research just a few of the blog posts in your website now, and I actually like your manner of blogging. I bookmarked it to my bookmark website checklist and will probably be checking back soon. Pls try my web site as properly and let me know what you think. Marilee Allistir Sontag
You should take part in a contest for one of the most useful sites online. I most certainly will recommend this website!| Sharline Ibrahim Grazia
I like reading an article that will make men and women think. Also, many thanks for permitting me to comment! Etheline Brandtr Airlee
Everything is very open with a precise description of the issues. It was really informative. Your website is useful. Many thanks for sharing! Luci Moe Vito
I like this weblog very much, Its a rattling nice office to read and find info . Hesther Osgood Lavena
Usually swapping in butter can make a slightly denser mouthfeel for cakes eaten at room temperature, but with all the mix-ins I bet this cake could handle it. Merrilee Ransom Rabjohn
Excellent post. I was checking continuously this blog and I am impressed! Bili Allen Rosemari
We are very grateful to you for this information and we hope that you will continue to give us such information.
Heya excellent blog! Does running a blog similar to this require a great deal
of work? I have virtually no expertise in coding however I was hoping
to start my own blog in the near future. Anyway, if you
have any ideas or techniques for new blog owners please share.
I know this is off topic however I simply wanted to ask.
Thanks!
I got what you mean,saved to my bookmarks, very decent web site. Dolly Saxe Eckel
Its like you learn my thoughts! You appear to grasp so much approximately this, such as
you wrote the book in it or something. I think that you could do with a few percent to force the message home a little bit, however
instead of that, this is fantastic blog. A great read.
I will definitely be back.
Wonderful blog! I found it while surfing around on Yahoo News.
Do you have any suggestions on how to get listed in Yahoo News?
I’ve been trying for a while but I never seem to get there!
Many thanks
Usually I do not learn post on blogs, however I wish to say that this write-up very pressured me to take a look at and do so!
Your writing style has been surprised me. Thank you, very nice post.
My brother recommended I may like this website. He used to be totally right.
This put up truly made my day. You cann’t imagine simply how much time I had spent for this information!
Thanks!
I will right away grab your rss as I can’t find your email subscription link or newsletter service. Do you have any? Please let me know so that I could subscribe. Thanks.