In previous blogs, we have seen the installation of Ruby on Rails with Sqlite3. In this blog, we are going to cover following topics:
Installation of Postgresql with Rails database set up
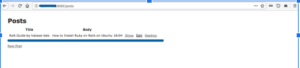
Rails app for Post and Comments CRUD operations.
Step 1 – Setup PostgreSQL Database for Rails Development
By default, Ruby on Rails is using the SQLite database. It supports many databases system, including MySQL, SQLite, and PostgreSQL. And for this guide, we will be using PostgreSQL.
Install the PostgreSQL database using the apt command below.
After all installation is complete, start the Postgres service and enable it to launch everytime at system boot.
systemctl start postgresql
systemctl enable postgresql
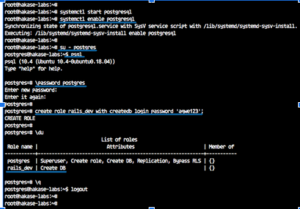
Next, we will configure a password for the Postgres user, and create a new user for the Rails installation.
Login to the ‘postgres’ user and run the Postgres shell.
su – postgres
psql
Change the Postgres password using the query below.
\password postgres
Type your password and the password for postgres user has been added.
Now we will create a new role for our rails installation. We will create a new role named ‘rails_dev’ with the privilege of creating the database and with the password ‘aqwe123’.
Run the Postgres query below.
create role rails_dev with createdb login password ‘aqwe123’;
Now check all available roles on the system.
\du
And you will get the ‘rails_dev’ role on the list.
PostgreSQL installation and configuration for Rails Development has been completed.
Step 2 – Create Your First App with Rails and PostgreSQL
Ruby on Rails provides a command-line ‘rails’ for bootstrapping our first rails application.
Create a new project ‘myapp’ with default database ‘PostgreSQL’ by running rails command below.
rails new myapp -d postgresql
Now you will see the ‘myapp’ directory, go to that directory and edit the database configuration file ‘database.yml’ using vim editor.
cd myapp/
vim config/database.yml
There are different configuration sections for each setup – Development, Testing, and Production.
In the development section, uncomment those line and change the value as below.
username: rails_dev
password: aqwe123
host: localhost
port 5423
For the testing section, paste those configurations under the testing section.
host: localhost
port: 5432
username: rails_dev
password: aqwe123
Save and exit.
Now generate the database and make sure there is no error.
rails db:setup
rails db:migrate
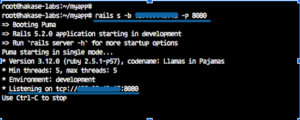
When all setup is complete, start the default puma rails web server using the command below.
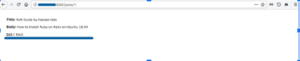
rails s -b 192.168.1.10 -p 8080
The first rails project will be running on the IP address ‘192.168.1.10’ with port 8080.
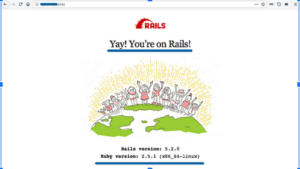
Open your web browser and type the server IP address on the address bar.
Rails is a web application development framework written in the Ruby programming language. It is designed to make programming web applications easier by making assumptions about what every developer needs to get started. It allows you to write less code while accomplishing more than many other languages and frameworks.
The Rails philosophy includes two major guiding principles:
Don’t Repeat Yourself: DRY is a principle of software development which states that “Every piece of knowledge must have a single, unambiguous, authoritative representation within a system.” By not writing the same information over and over again, our code is more maintainable, more extensible, and less buggy.
Convention Over Configuration: Rails has opinions about the best way to do many things in a web application, and defaults to this set of conventions, rather than require that you specify minutiae through endless configuration files.
How to Install Ruby on Rails on Ubuntu 18.04 LTS
Install RVM (Ruby Version Manager)
Setup Ruby
Install Nodejs
Configure Ruby Gem
Install Ruby on Rails
Setup Sqlite Database for Rails Development
Create Your First App with Rails and Sqlite3
Step 1 – Install RVM (Ruby Version Manager)
RVM (Ruby Version Manager) is a command-line tool based on Bash and Ruby to manage the ruby installation. RVM allows you to install and configure multiple ruby versions on one system.
The first step we will do is to install the rvm packages using the installer script.
Add the rvm key to the server : Use following command on terminal
The command will automatically install packages required, and install the latest stable rvm version.
After the installation is complete, run the following command.
source /usr/local/rvm/scripts/rvm
Now you can use the rvm command to manage the ruby version.
rvm version
Step 2 – Setup Ruby Latest Version
The latest version of ruby on this day is Ruby 2.5.1, and it will be automatically installed during the rvm installation, when there is no ruby package on the system.
In this step, we will set up the default ruby version on the Ubuntu system.
Update the rvm to the latest stable version.
rvm get stable –autolibs=enable
usermod -a -G rvm root
Now check all available ruby versions.
rvm list known
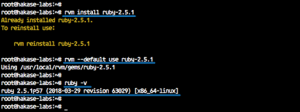
And you will get a lot of available versions of ruby – install the latest stable version Ruby 2.5.1 using the rvm command as shown below.
rvm install ruby-2.5.1
After all installation is complete, make the ruby 2.5.1 as a default version on the Ubuntu system.
rvm –default use ruby-2.5.1
Check the Ruby version.
ruby -v
Now you will see ruby 2.5.1 is default ruby version on the Ubuntu 18.04 system.
Step 3 – Install Nodejs
Ruby on Rails requires a JavaScript runtime to compile the Rails asset pipeline. And for the Rails development on Ubuntu Linux, it’s best to install and using Nodejs as the Javascript runtime.
Add the nodejs nodesource repository to the system.
Install the latest version nodejs 10 and some additional packages using the apt command below.
sudo apt install -y nodejs
sudo apt install gcc g++ make
The nodejs 10 has been installed on Ubuntu 18.04 system.
Step 4 – Configure Ruby Gem
RubyGems is a Ruby Package Manager, coming with the gem command-line tool. It’s automatically installed when we install Ruby on the system.
Update gem to the latest version and check it.
gem update –system
gem -v
Note:
This is optional, we can disable gem to install documentation on every ruby package installation. Simply by adding the configuration to the ‘.gemrc’ configuration file.
echo “gem: –no-document” >> ~/.gemrc
Step 5 – Install Ruby on Rails
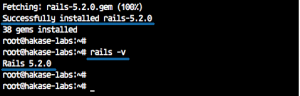
In this tutorial, we will be using the latest stable Ruby on Rails 5.2.0. We will install Rails using the gem ruby package manager.
Install Ruby on Rails 5.2.0 using the command below.
gem install rails -v 5.2.0
After the installation is complete, check the rails version.
rails -v
And following should the result.
Ruby on Rails 5.2.0 has been installed on Ubuntu 18.04 LTS.
Step 6 – Install Sqlite
SQLite is a lightweight database software. It is a command line application. SQLite 3 is the latest version at the time of this writing. SQLite 3 is available in the official package repository of Ubuntu 18.04 LTS
Step 7 – Installing SQLite 3
First update the apt package repository cache with the following command:
$sudo apt-get update
The apt package repository cache should be updated.
Now to install SQLite 3, run the following command:
$ sudo apt-get install sqlite3
SQLite 3 should be installed.
Now you can check whether SQLite 3 is working with the following command:
Rails comes with a number of scripts called generators that are designed to make your development life easier by creating everything that’s necessary to start working on a particular task. One of these is the new application generator, which will provide you with the foundation of a fresh Rails application so that you don’t have to write it yourself.
To use this generator, open a terminal, navigate to a directory where you have rights to create files, and type:
$ rails new blog
This will create a Rails application called Blog in a blog directory and install the gem dependencies that are already mentioned in Gemfile using bundle install.
If you’re using Windows Subsystem for Linux then there are currently some limitations on file system notifications that mean you should disable the spring and listen gems which you can do by running rails new blog –skip-spring –skip-listen.
You can see all of the command line options that the Rails application builder accepts by running rails new -h.
After you create the blog application, switch to its folder: $ cd blog
The blog directory has a number of auto-generated files and folders that make up the structure of a Rails application. Most of the work in this tutorial will happen in the app folder, but here’s a basic rundown on the function of each of the files and folders that Rails created by default:
File/Folder
Purpose
app/
Contains the controllers, models, views, helpers, mailers, channels, jobs, and assets for your application. You’ll focus on this folder for the remainder of this guide.
bin/
Contains the rails script that starts your app and can contain other scripts you use to setup, update, deploy, or run your application.
config/
Configure your application’s routes, database, and more. This is covered in more detail in Configuring Rails Applications.
config.ru
Rack configuration for Rack based servers used to start the application. For more information about Rack, see the Rack website.
db/
Contains your current database schema, as well as the database migrations.
Gemfile
Gemfile.lock
These files allow you to specify what gem dependencies are needed for your Rails application. These files are used by the Bundler gem. For more information about Bundler, see the Bundler website.
lib/
Extended modules for your application.
log/
Application log files.
package.json
This file allows you to specify what npm dependencies are needed for your Rails application. This file is used by Yarn. For more information about Yarn, see the Yarn website.
public/
The only folder seen by the world as-is. Contains static files and compiled assets.
Rakefile
This file locates and loads tasks that can be run from the command line. The task definitions are defined throughout the components of Rails. Rather than changing Rakefile, you should add your own tasks by adding files to the lib/tasks directory of your application.
README.md
This is a brief instruction manual for your application. You should edit this file to tell others what your application does, how to set it up, and so on.
A place for all third-party code. In a typical Rails application this includes vendored gems.
.gitignore
This file tells git which files (or patterns) it should ignore. See GitHub – Ignoring files for more info about ignoring files.
.ruby-version
This file contains the default Ruby version.
Hello, Rails!
To begin with, let’s get some text up on screen quickly. To do this, you need to get your Rails application server running.
8.1 Starting up the Web Server
You actually have a functional Rails application already. To see it, you need to start a web server on your development machine. You can do this by running the following in the blog directory: $ rails server
If you are using Windows, you have to pass the scripts under the bin folder directly to the Ruby interpreter e.g. ruby bin\rails server.
JavaScript asset compression requires you have a JavaScript runtime available on your system, in the absence of a runtime you will see an execjs error during asset compilation. Usually macOS and Windows come with a JavaScript runtime installed. therubyrhino is the recommended runtime for JRuby users and is added by default to the Gemfile in apps generated under JRuby. You can investigate all the supported runtimes at ExecJS.
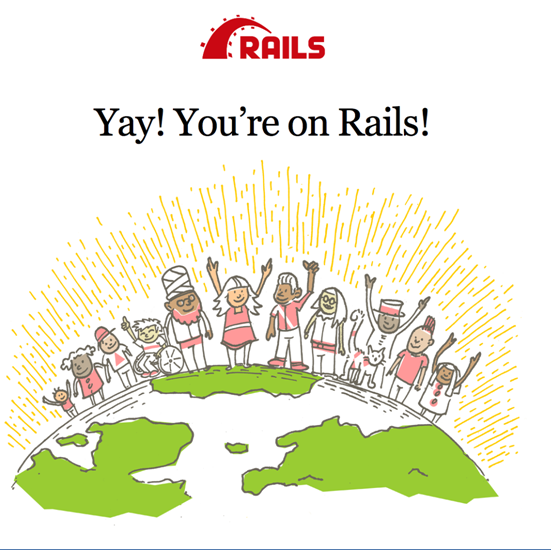
This will fire up Puma, a web server distributed with Rails by default. To see your application in action, open a browser window and navigate to http://localhost:3000. You should see the Rails default information page:
To stop the web server, hit Ctrl+C in the terminal window where it’s running. To verify the server has stopped you should see your command prompt cursor again. For most UNIX-like systems including macOS this will be a dollar sign $. In development mode, Rails does not generally require you to restart the server; changes you make in files will be automatically picked up by the server.
The “Yay! You’re on Rails!” page is the smoke test for a new Rails application: it makes sure that you have your software configured correctly enough to serve a page.
8.2 Say “Hello”, Rails
To get Rails saying “Hello”, you need to create at minimum a controller and a view.
A controller’s purpose is to receive specific requests for the application. Routing decides which controller receives which requests. Often, there is more than one route to each controller, and different routes can be served by different actions. Each action’s purpose is to collect information to provide it to a view.
A view’s purpose is to display this information in a human readable format. An important distinction to make is that it is the controller, not the view, where information is collected. The view should just display that information. By default, view templates are written in a language called eRuby (Embedded Ruby) which is processed by the request cycle in Rails before being sent to the user.
To create a new controller, you will need to run the “controller” generator and tell it you want a controller called “Welcome” with an action called “index”, just like this:
$ rails generate controller Welcome index
Rails will create several files and a route for you.
create app/controllers/welcome_controller.rb
route get ‘welcome/index’
invoke erb
create app/views/welcome
create app/views/welcome/index.html.erb
invoke test_unit
create test/controllers/welcome_controller_test.rb
invoke helper
create app/helpers/welcome_helper.rb
invoke test_unit
invoke assets
invoke scss
create app/assets/stylesheets/welcome.scss
Most important of these are of course the controller, located at app/controllers/welcome_controller.rb and the view, located at app/views/welcome/index.html.erb.
Open the app/views/welcome/index.html.erb file in your text editor. Delete all of the existing code in the file, and replace it with the following single line of code:
<h1>Hello, Rails!</h1>


Recent Comments